Thursday, September 8, 2022
Sunday, September 4, 2022
How to access EC2 instance if lost key Pair and root credentials
Step-1:
Create a new instance with same OS as previous one or create it from AIM made from old instance
Step-2:
Shutdown the old instance and detach the volume
Step-3:
Shutdown new instance Attached the detached volume to new instance and start the instance
Step-4:
Login new instance using ssh console
Run the following commands:
lsblk
df -h
cd mnt
mkdir oldvolume
sudo mount /dev/sda1 mnt/oldvolume
cd mnt/oldvolume/root/.ssh
sudo vi authorized_keys
Now add your public key and save
umount /dev/sda1
sudo shutdown now
Step-5:
Now detach the dev/sda1 volume from new instance and attach to old instance as dev/sda
Step-6:
Reboot old instance from AWS dashboard and login your old instance using ssh console
Note: Your old instance IP will be changed after doing this if no elastic IP
Friday, September 2, 2022
Install NVM (Node Version Manager) on macOS with Homebrew
echo "# Homebrew\nexport PATH=/opt/homebrew/bin:\$PATH" >> .bash_profile
source ~/.zshrc
brew install nvm
mkdir ~/.nvm
echo "export NVM_DIR=~/.nvm\nsource \$(brew --prefix nvm)/nvm.sh" >> .bash_profile
source ~/.bash_profile
or
echo "export NVM_DIR=~/.nvm\nsource \$(brew --prefix nvm)/nvm.sh" >> .zshrc
source ~/.zshrc
nvm install 12.13.0
nvm install --lts
Wednesday, August 31, 2022
How to install and run MongoDB GUI on Ubuntu 20.04
The following are the different ways to install mongo-gui.
From npm:
Install the module globally using the command :
npm install -g mongo-gui
Then use the command to run the application
mongo-gui
From github:
First of all, clone the mongo-gui repository using the command git clone https://github.com/arunbandari/mongo-gui or download the zip file from here.
Change the directory to mongo-gui
cd mongo-gui
Install all the dependencies npm install
Start the application using either
npm start or node server.js
Note: Node.js must be installed on your machine to run this application
From Docker Hub:
Docker compose
version: '3'
services:
mongo-gui:
container_name: "mongo-gui"
image: ugleiton/mongo-gui
restart: always
ports:
- "4321:4321"
environment:
- MONGO_URL=mongodb://localhost:27017
Mongo GUI Usage
The commands mongo-gui and npm start or node server.js start the application with the following configuaration:
URL (-u): mongodb://localhost:27017
PORT (-p): 4321
and the application will be accesible at http://localhost:4321
To connect to any other mongodb instance, pass mongo connection string as an argument, eg:
Installed via npm: mongo-gui -u mongodb+srv://<username>:<password>@host/<dbnames>?retryWrites=true&w=majority'
Installed via github: (npm start --/node server.js) -u mongodb+srv://<username>:<password>@host/<dbnames>?retryWrites=true&w=majority'
Available options:
-u: url, mongo-gui tries to connect to this mongodb instance
-p: port, mongo-gui listens on this port
Tuesday, August 30, 2022
Failed to start mongod.service: Unit mongod.service not found Solved !
When I started MongoDB got an error as:
"Failed to start mongod.service: Unit mongod.service not found."
Check port and configuration
Solution:
sudo service mongod status
sudo systemctl enable mongod
sudo service mongod restart
service mongod stop
#dont start mongod…instead…

systemctl start mongod
#then mongo command
#thenmongo
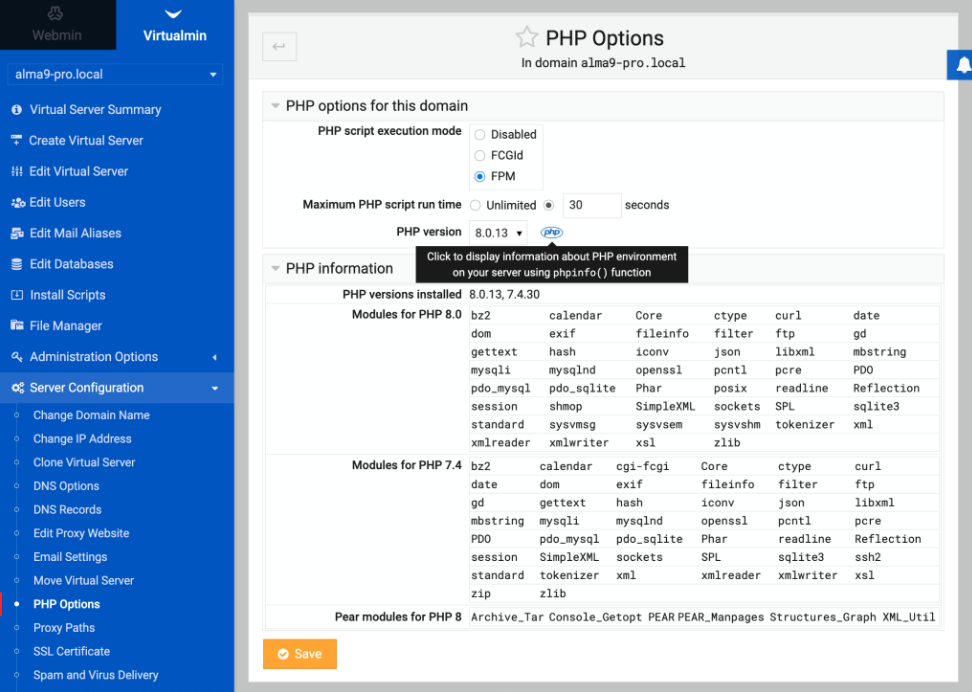
How to install composer and use it on Ubuntu
Install multiple PHP version on Ubuntu for Virtualmin
Enable ondrej/php repository
LC_ALL=C.UTF-8 add-apt-repository -y ppa:ondrej/php && apt-get update
Install additional PHP packagesapt-get install php*-{cgi,cli,fpm,pdo,gd,mbstring,mysqlnd,opcache,xml,zip} Note: php* should be replaced with a specific PHP version, i.e. php7.4, unless you really need to install all available additional PHP versions.
Configuring the second PHP Version in Virtualmin
The following PHP execution modes are available : fpm
The following PHP-FPM versions are available : 8.0.13 (php-fpm) 7.4.30 (php74-php-fpm) 8.2.0 (php82-php-fpm)
You can configure which one is the default PHP version used on new Virtual Servers. The default is to use the newest available. You can change that default in System Settings → Server Templates → Default → PHP Options page.
Configuring Individual Virtual Servers
You can configure the PHP version being used for a specific Virtual Server by selecting Server Configuration → PHP Options.