# sh <(curl https://autoinstall.plesk.com/one-click-installer || wget -O - https://autoinstall.plesk.com/one-click-installer)
Showing posts with label Ubuntu. Show all posts
Showing posts with label Ubuntu. Show all posts
Monday, September 30, 2024
Tuesday, April 2, 2024
Saturday, June 3, 2023
How To Install PHP (8.2, 8.1, 7.4,7.3) on Ubuntu 22.04
sudo apt update && sudo apt upgrade
sudo apt install software-properties-common ca-certificates lsb-release apt-transport-https
LC_ALL=C.UTF-8 sudo add-apt-repository ppa:ondrej/php
sudo apt update
sudo apt install php8.2
sudo apt install php5.6
apt-get install php*-{cgi,cli,fpm,pdo,gd,mbstring,mysqlnd,opcache,xml,zip}
sudo apt install php8.1
sudo apt install php8.0
sudo apt install php7.4
sudo apt install php7.3
[If you use virtualmin then check PHP option to select your desired version]
Sunday, October 23, 2022
How to move all files and folders via mv command
To move all files & folders from one destination to another:
mv /path/sourcefolder/* /path/destinationfolder/
To move All files & Folder of current:
mv * /path/destinationfolder/
To move single File:
mv filename.zip /path/destinationfolder/
Friday, October 21, 2022
How to install MySQL on Ubuntu 22.04
Installing MySQL:
sudo apt update
sudo apt install mysql-server
sudo systemctl start mysql.service
Configuring MySQL:
sudo mysql_secure_installation
Creating a Dedicated MySQL User and Granting Privileges:
sudo mysql
mysql -u root -p
CREATE USER 'mailapp'@'localhost' IDENTIFIED WITH authentication_plugin BY 'password';
CREATE USER 'mailapp'@'localhost' IDENTIFIED BY 'password';
CREATE USER 'mailapp'@'localhost' IDENTIFIED WITH mysql_native_password BY 'password';
ALTER USER 'mailapp'@'localhost' IDENTIFIED WITH mysql_native_password BY 'password';
GRANT CREATE, ALTER, DROP, INSERT, UPDATE, DELETE, SELECT on *.* TO 'mailapp'@'localhost' WITH GRANT OPTION;
GRANT ALL PRIVILEGES ON *.* TO 'mailapp'@'localhost' WITH GRANT OPTION;
FLUSH PRIVILEGES;
exit
mysql -u mailapp -p
Thursday, September 15, 2022
How to remove directory in Linux
To permanently remove a directory in Linux, use either rmdir or rm command:
- For empty directories, use
rmdir [dirname]orrm -d [dirname] - For non-empty directories, use
rm -r [dirname]
Before you remove a directory, you need to know the name of it. To discover files and directories, use the ls command, and to know the current directory you are in, use the pwd command.
The options you use together with these commands are also important to determine how they work. Here’s a quick recap of rm command options:
| Command and Option | Description |
| rm -d | Remove an empty directory using the rm command. |
| rm -r | Remove a non-empty directory and its content. |
| rm -f | Ignore any prompt when deleting a write-protected file. |
| rm -rf | Ignore any prompt when deleting a write-protected non-empty folder. |
| rm -i | Output a prompt before deleting every file. |
| rm -I | Output a prompt only once before deleting more than three files. |
| rm * | Wildcard that represents multiple characters. |
| rm ? | Wildcard that represents a single character. |
| rmdir -p | Remove an empty subdirectory and its parent directory. |
| rmdir -v | Print the information that the specified directory was deleted. |
Sunday, September 4, 2022
How to access EC2 instance if lost key Pair and root credentials
Step-1:
Create a new instance with same OS as previous one or create it from AIM made from old instance
Step-2:
Shutdown the old instance and detach the volume
Step-3:
Shutdown new instance Attached the detached volume to new instance and start the instance
Step-4:
Login new instance using ssh console
Run the following commands:
lsblk
df -h
cd mnt
mkdir oldvolume
sudo mount /dev/sda1 mnt/oldvolume
cd mnt/oldvolume/root/.ssh
sudo vi authorized_keys
Now add your public key and save
umount /dev/sda1
sudo shutdown now
Step-5:
Now detach the dev/sda1 volume from new instance and attach to old instance as dev/sda
Step-6:
Reboot old instance from AWS dashboard and login your old instance using ssh console
Note: Your old instance IP will be changed after doing this if no elastic IP
Tuesday, August 30, 2022
How to install composer and use it on Ubuntu
sudo apt update
sudo apt install wget php-cli php-zip unzip
wget -O composer-setup.php https://getcomposer.org/installer
sudo php composer-setup.php --install-dir=/usr/local/bin --filename=composer
sudo php composer-setup.php --install-dir=/path/to/project
sudo composer self-update
composer require nesbot/carbon
Install multiple PHP version on Ubuntu for Virtualmin
Enable ondrej/php repository
LC_ALL=C.UTF-8 add-apt-repository -y ppa:ondrej/php && apt-get update
Install additional PHP packagesapt-get install php*-{cgi,cli,fpm,pdo,gd,mbstring,mysqlnd,opcache,xml,zip} Note: php* should be replaced with a specific PHP version, i.e. php7.4, unless you really need to install all available additional PHP versions.
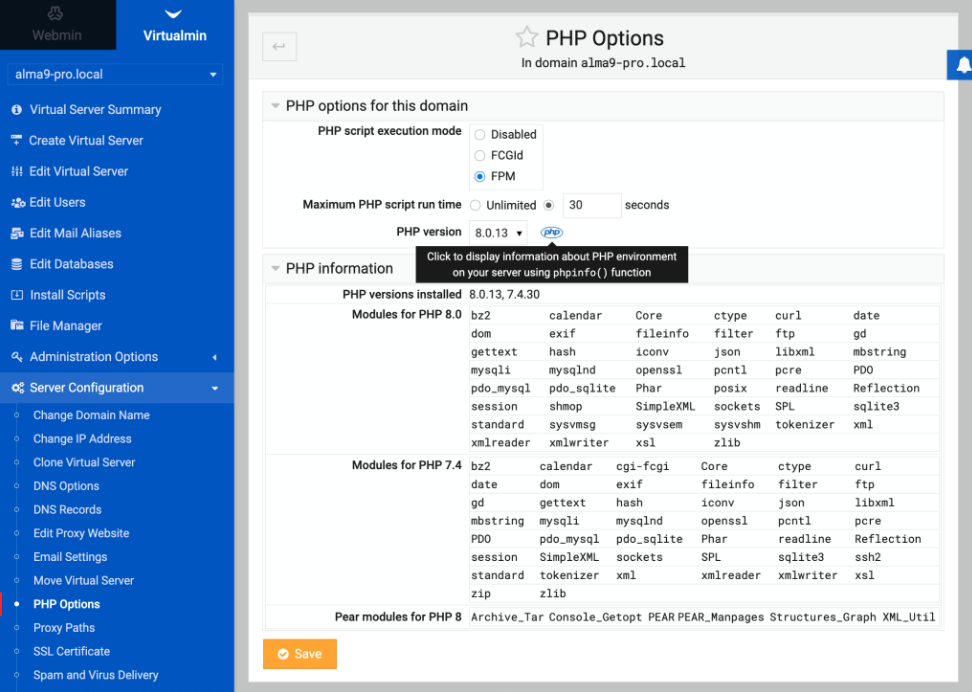
Configuring the second PHP Version in Virtualmin
The following PHP execution modes are available : fpm
The following PHP-FPM versions are available : 8.0.13 (php-fpm) 7.4.30 (php74-php-fpm) 8.2.0 (php82-php-fpm)
You can configure which one is the default PHP version used on new Virtual Servers. The default is to use the newest available. You can change that default in System Settings → Server Templates → Default → PHP Options page.
Configuring Individual Virtual Servers
You can configure the PHP version being used for a specific Virtual Server by selecting Server Configuration → PHP Options.
Source: https://www.virtualmin.com/documentation/web/multiplephp/
Monday, August 29, 2022
How to install NGINX and configure on Ubuntu 20.04
sudo apt-get update
sudo apt upgrade
sudo apt install nginx
sudo systemctl status nginx
sudo ufw allow http
sudo ufw reload
sudo systemctl status nginx
sudo systemctl stop nginx
sudo systemctl start nginx
sudo systemctl disable nginx
sudo systemctl enable nginx
sudo systemctl restart nginx
sudo systemctl reload nginx
sudo unlink /etc/nginx/sites-enabled/default
sudo ln -s /etc/nginx/sites-available/example.com /etc/nginx/sites-enabled/
sudo nginx -t
sudo systemctl restart nginx
sudo mkdir /var/www/example.com
How to unzip tar.gz file in linux
sudo apt-get install zip
unzip file.zip -d destination_folderunzip file.zip
tar -xf archive.tar.gz
Thursday, August 25, 2022
How to add public key to authorized_keys ec2 instance Ubunutu Linux
Step 1: Login into you AWS account and go to EC2 instances
Step 2: Select your instance and click connect
Step 2: Then click connect button at the bottom right corner
Step 3: Now a new tab will be opened with console as follows
Step 4: Copy your SSH public key then add the key to the following key file
Use this command in Mac/Windows powershell to copy your public key: pbcopy ~/.ssh/id_rsa.pub
nano ~/.ssh/authorized_keys
Step 5: Save and reboot then try to connect again with device from which public key generated.
Friday, February 25, 2022
How to change root pasword using ssh command
The procedure to change the root user password on Ubuntu Linux:
Type the following command to become root user and issue passwd:
sudo -i
passwd
OR set a password for root user in a single command:
sudo passwd root
Test it your root password by typing the following command:
su -
Thursday, August 12, 2021
Remove the Apache Web Server Ubuntu
sudo service apache2 stop
sudo systemctl disable apache2
sudo apt remove apache2
sudo apt autoremove
Sunday, August 8, 2021
Change Ubuntu server Hoatname permanently
Type the hostnamectl command :
sudo hostnamectl set-hostname newNameHere
Delete the old name and setup new name.
Next Edit the /etc/hosts file:
sudo nano /etc/hosts
Replace any occurrence of the existing computer name with your new one.
Reboot the system to changes take effect:
sudo reboot
Saturday, April 17, 2021
Install Webmin on Ubuntu 20.04
sudo apt update
sudo apt install wget apt-transport-https software-properties-common
wget -q http://www.webmin.com/jcameron-key.asc -O- | sudo apt-key add -
sudo add-apt-repository "deb [arch=amd64] http://download.webmin.com/download/repository sarge contrib"
sudo apt install webminsudo systemctl status webmin
sudo ufw allow 10000/tcpsudo ufw reload
https://server-ip:10000/Thursday, April 15, 2021
Install geoip-database in Ubuntu 20
- Update the package index:
# sudo apt-get update - Install geoip-database deb package:
# sudo apt-get install geoip-database
Install extensions for PHP 7.4 on Ubuntu 20
sudo apt-get install php7.4-cli php7.4-fpm php7.4-bcmath php7.4-curl php7.4-gd php7.4-intl php7.4-json php7.4-mbstring php7.4-mysql php7.4-opcache php7.4-sqlite3 php7.4-xml php7.4-zip
or
sudo apt update
sudo apt install php7.4
sudo apt install php7.4-common php7.4-mysql php7.4-xml php7.4-xmlrpc php7.4-curl php7.4-gd php7.4-imagick php7.4-cli php7.4-dev php7.4-imap php7.4-mbstring php7.4-opcache php7.4-soap php7.4-zip php7.4-intl -y
Thursday, February 25, 2021
How to install Fully Featured Mail Server using Postal on Ubuntu 16.04
Prerquisites:
Ruby 2.3 or higher
MySQL or MariaDB database server
Erlang
RabbitMQ server
Node.js (for javascript compilation)
Git (for accessing the repository)
Nginx
Installing dependencies:
Install Ruby
sudo apt install software-properties-common
sudo apt-add-repository ppa:brightbox/ruby-ng
sudo apt update
sudo apt install ruby2.3 ruby2.3-dev build-essential
Install MySQL
sudo apt-key adv --recv-keys --keyserver hkp://keyserver.ubuntu.com:80 0xF1656F24C74CD1D8
sudo add-apt-repository 'deb [arch=amd64,i386,ppc64el] http://mirrors.coreix.net/mariadb/repo/10.1/ubuntu xenial main'
sudo apt update
sudo apt install mariadb-server libmysqlclient-dev
Some additional configuration may be required to optimise your MySQL server. This is outside the scope of this documentation.
wget https://packages.erlang-solutions.com/erlang-solutions_1.0_all.deb
sudo dpkg -i erlang-solutions_1.0_all.deb
sudo apt-get update sudo apt-get install erlang
sudo apt-get update sudo apt-get install esl-erlang
sudo apt-get update sudo apt-get install erlang
sudo apt-get update sudo apt-get install esl-erlang
If there is any issue while installing Erlang then use the following command:
sudo apt-get purge elixir
sudo apt-get purge erlang
sudo apt-get install esl-erlangInstall RabbitMQ
curl -s https://packagecloud.io/install/repositories/rabbitmq/rabbitmq-server/script.deb.sh | sudo bash
sudo apt update
sudo apt-get install apt-transport-httpssudo apt install rabbitmq-server
Install Node.js
sudo apt install nodejs
Install Git
sudo apt install git
There is documentation for installing the core prerequisites if needed.
Preparing the database
Postal has a single main MySQL database that contains all configuration and each mail server you create will have its own database that stores its messages and other mail-server specific content. No configuration is stored in the mail server databases.
mysql -u root -p -h 127.0.0.1
Begin by creating your main database. Run the commands below to create a new database. Replace XXX with a suitable password.
CREATE DATABASE `postal` CHARSET utf8mb4 COLLATE utf8mb4_unicode_ci;
GRANT ALL ON `postal`.* TO `postal`@`127.0.0.1` IDENTIFIED BY "XXX";
Postal will handle the creation of databases for your mail servers but you need to give it access to do this. Run the following to add a grant that permits a user to manage all databases that are prefixed with postal-.
GRANT ALL PRIVILEGES ON `postal-%` . * to `postal`@`127.0.0.1` IDENTIFIED BY "XXX";
Setting up RabbitMQ
Postal requires its own RabbitMQ vhost and user to connect with. You can create these using the following commands:
sudo rabbitmqctl add_vhost /postal
sudo rabbitmqctl add_user postal XXX
sudo rabbitmqctl set_permissions -p /postal postal ".*" ".*" ".*"
Preparing your operating system
Postal should be executed as its own user on your server. Run the following commands to create a new user with a home directory in /opt/postal.
sudo useradd -r -m -d /opt/postal -s /bin/bash postal
Postal needs to be able to listen on privileged ports (for example 80, 443 and 25). To enable this, we will allow ruby to listen on these ports. On a shared server this would be a security risk however on a server dedicated to Postal, this shouldn't cause any issues.
sudo setcap 'cap_net_bind_service=+ep' /usr/bin/ruby2.3
Installing system-wide gems
To run Postal, you'll need to have bundler and procodile installed on your system. Install them both:
sudo gem install bundler
sudo gem install procodile
Cloning the repository
Now, we're ready to get the repository cloned onto your server. Run the clone command as your postal user and clone into the /opt/postal/app directory.
sudo -i -u postal git clone https://github.com/atech/postal /opt/postal/app
The master branch (which is cloned by default) will contain the most stable version of the software. If you wish to work with a less stable branch, use the devel branch.
Postal provides a single binary that allows you to interact with it from any directory on your server. To make this available everywhere, simply symlink it into the /usr/bin/postal directory.
sudo ln -s /opt/postal/app/bin/postal /usr/bin/postal
Install Ruby dependencies
This will install all the required dependencies required to run the application.
postal bundle /opt/postal/app/vendor/bundle
Setting up configuration files
Before you can do anything, you'll need to generate the default configuration. By default, configuration is kept outside of the repository file structure and is stored in /opt/postal/config. Generate the initial configuration with the following command:
postal initialize-config
This will create a number of files for your configuration, including various private keys & certificates as well as a default postal.yml configuration file.
Configuring
Open up your new postal.yml configuration file from /opt/postal/config. Follow the comments in the example file and update items as appropriate based on your installation.
Initialize database & assets
postal initialize
Create your initial admin user
postal make-user
This will guide you through setting up a new admin user for your installation. You'll be prompted for an e-mail address, name & password. You can then use these when you first login.
Starting the application
To start the application, just run the following command. This will run postal in the foreground. This is only useful for testing and development. You'll run it in the background when you're sure everything is working.
postal run
If everything looks OK, you can just CTRL+C this and continue. If there are any errors, you should investigate these before continuing.
Now, you can run postal in the background on your server:
postal start
You can look at the status at any time using postal status.
Configuring Nginx
The Postal management interface and API should sit behind nginx. Install it and configure it as appropriate.
sudo apt install nginx
Once installed, you can change the default site configuration to match something suitable. The repository contains an example config file that you can copy into place.
sudo cp /opt/postal/app/resource/nginx.cfg /etc/nginx/sites-available/default
You can create a self signed SSL certificate if you need to (otherwise put your own
key & cert in /etc/nginx/ssl/postal.crt and postal.key)
sudo mkdir /etc/nginx/ssl/
sudo openssl req -x509 -newkey rsa:4096 -keyout /etc/nginx/ssl/postal.key -out /etc/nginx/ssl/postal.crt -days 365 -nodes
Make the appropriate changes for your domain and SSL certificate and then restart
sudo nano -w /etc/nginx/sites-available/default
sudo /etc/init.d/nginx restart
This might be a good time to set up Let's Encrypt rather than using a self-signed certificate. CertBot is a good way to go about setting this up.
Accessing the web interface
You can now navigate to your domain and you should see the Postal web interface asking for a login. You can login using the credentials you created earlier.
You can start by creating your own organization & mail server and exploring the system.
By default, the system is not configured to use any IP pools that are configured. Messages will be sent from the main IP on the server. Configuring multiple IP pools will be covered in other documentation.
Configuring Postal SMTP
The Postal system itself needs to be able to send e-mails. This is something that needs to be configured in your postal.yml configuration file. You can send these messages using Postal itself. Just create a new mail server and use its credentials in your config file. Postal sends emails when servers are approaching limits, new users are invited, password resets and more.
Once you have added the configuration for this, you can test the configuration using the command below. Replace the e-mail address with one of your own.
postal test-app-smtp youraddress@domain.com
Complete Installation with Git Repo:
https://gist.githubusercontent.com/amisalabir/5fd99cd156b2eba220ae826ef8348f89/raw/44bd3f5314e116c9134456aecae3258f15f10479/ubuntu1604.sh
Tuesday, February 23, 2021
Install and enable CURL extention for PHP 7.4 on Ubuntu 20.04
apt-get install php7.4-gd
/etc/init.d/apache2 restart
apt-get install php7.4-curl
/etc/init.d/apache2 restart
Subscribe to:
Posts (Atom)
How to install n8n on WSL Ubuntu and test bKash Sandbox with workflow
Step-1: Install/(Upgrade to Ubunto 22) Ubuntu on your Windows sudo apt update && sudo apt full-upgrade -y sudo do-release-upgrade ...
