Tuesday, August 30, 2022

Install multiple PHP version on Ubuntu for Virtualmin

 Enable ondrej/php repository

LC_ALL=C.UTF-8 add-apt-repository -y ppa:ondrej/php && apt-get update
Install additional PHP packages
apt-get install php*-{cgi,cli,fpm,pdo,gd,mbstring,mysqlnd,opcache,xml,zip} 

Note: php* should be replaced with a specific PHP version, i.e. php7.4, unless you really need to install all available additional PHP versions.

Configuring the second PHP Version in Virtualmin

Once you have completed the installation of a second PHP version on your server, you can verify that Virtualmin sees it by logging into Virtualmin, and clicking System Settings → Re-Check Config. You should see something like this:
The following PHP execution modes are available : fpm
The following PHP-FPM versions are available : 8.0.13 (php-fpm) 7.4.30 (php74-php-fpm) 8.2.0 (php82-php-fpm) 

You can configure which one is the default PHP version used on new Virtual Servers. The default is to use the newest available. You can change that default in System Settings → Server Templates → Default → PHP Options page.

Configuring Individual Virtual Servers

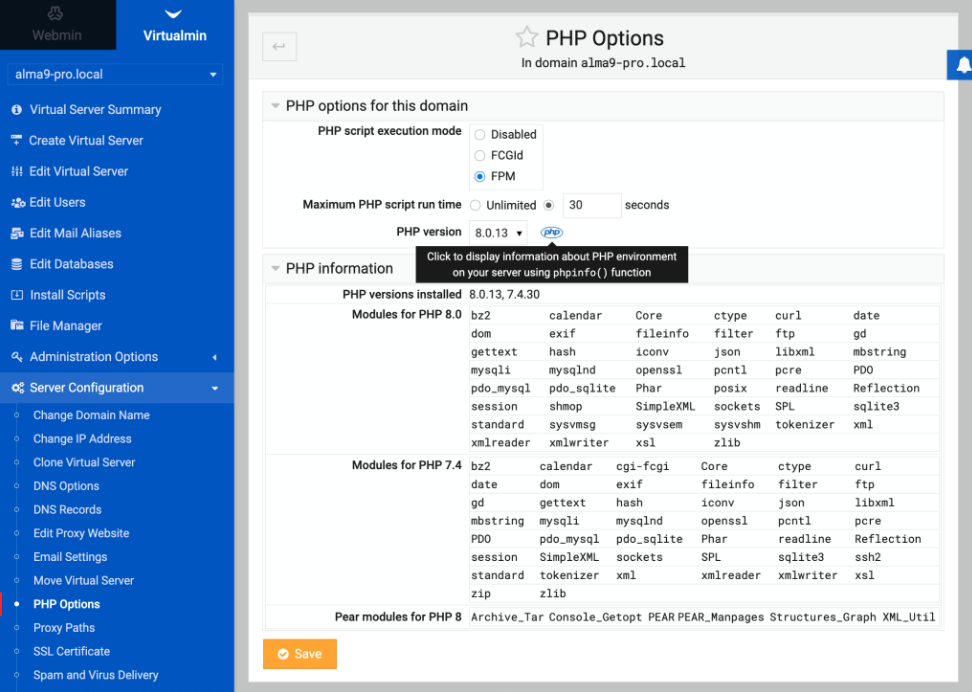
You can configure the PHP version being used for a specific Virtual Server by selecting Server Configuration → PHP Options.


Source: https://www.virtualmin.com/documentation/web/multiplephp/


How to Install Apache2 to make Web Server on Ubuntu 20.04

 sudo apt update

sudo apt install apache2

sudo systemctl is-active apache2

sudo systemctl is-enabled apache2

sudo systemctl status apache2

sudo systemctl stop apache2      #stop apache2

sudo systemctl start apache2     #start apache2

sudo systemctl restart apache2   #restart apache2

sudo systemctl reload apache2    #reload apache2

sudo systemctl disable apache2   #disable apache2

sudo systemctl enable apache2    #enable apache2

ls /etc/apache2/*

sudo vim /etc/apache2/apache2.conf 

ServerName webserver1.tecmint.com

sudo apache2ctl configtest

sudo systemctl restart apache2

sudo systemctl status apache2

sudo ufw allow http

sudo ufw allow https

sudo ufw reload

OR

sudo ufw allow 80/tcp

sudo ufw allow 443/tcp

sudo ufw reload


ls /var/www/html/

sudo mkdir -p /var/www/html/olineit.info

sudo chown www-data:www-data -R /var/www/html/olineit.info

sudo chmod 775 -R /var/www/html/olineit.info

sudo vim /var/www/html/olineit.info/index.html

sudo vim /etc/apache2/sites-available/olineit.info.conf

sudo a2ensite olineit.info.conf

sudo systemctl reload apache2


Installing Virtualmin after webmin


Once Webmin is operational you can download and install the Virtualmin modules and theme in either RPM format (for RPM-based Linux distributions), deb format (for deb-based Linux distributions), or wbm format (for any other UNIX or Linux system), and install them using the Webmin Modules module found in Webmin:Webmin Configuration.

https://software.virtualmin.com/vm/6/gpl/wbm/

virtual-server-7.1.gpl-1.wbm.gz

install any MTA like Postfix, Sendmail or Qmail

How to install and use multiple php versions on ubuntu 22.04

sudo apt-get update

sudo apt-get upgrade 


sudo apt-get install php7.0 php7.0-fpm

sudo apt-get install php7.0-mysql php7.0-mbstring php7.0-xml php7.0-gd php7.0-curl


sudo apt-get install php7.1 php7.1-fpm

sudo apt-get install php7.1-mysql php7.1-mbstring php7.1-xml php7.1-gd php7.1-curl


Monday, August 29, 2022

How to install NGINX and configure on Ubuntu 20.04

sudo apt-get update

sudo apt upgrade

sudo apt install nginx

sudo systemctl status nginx

sudo ufw allow http

sudo ufw reload


sudo systemctl status nginx

sudo systemctl stop nginx

sudo systemctl start nginx


sudo systemctl disable nginx

sudo systemctl enable nginx

sudo systemctl restart nginx

sudo systemctl reload nginx


sudo unlink /etc/nginx/sites-enabled/default

sudo ln -s /etc/nginx/sites-available/example.com /etc/nginx/sites-enabled/

sudo nginx -t

sudo systemctl restart nginx

sudo mkdir /var/www/example.com

How to unzip tar.gz file in linux

sudo apt-get install zip

unzip file.zip -d destination_folder

unzip file.zip

tar -xf archive.tar.gz

Sunday, August 28, 2022

How To Set Up Nginx Virtual Hosts Server Blocks on Ubuntu 20.04

Follow the steps to Set Up Nginx Virtual Hosts Server Blocks on Ubuntu 20.04:


 1. Create New Document Root Directory


sudo mkdir -p /var/www/yourdomain.com/public

sudo chown -R $USER:$USER /var/www/yourdomain.com/public

sudo chmod -R 755 /var/www


2. Creating Pages

nano /var/www/yourdomain.com/public/index.html


3.Creating new site available or server block copied from existing/default domain:

sudo cp /etc/nginx/sites-available/defaultdomain.com /etc/nginx/sites-available/yourdomain.com


4.  Enabling  Server Blocks and Restart Nginx

sudo ln -s /etc/nginx/sites-available/yourdomain.com /etc/nginx/sites-enabled/


5. Restart Nginx

sudo nginx -t

sudo systemctl restart nginx


6. Modify Local hosts file (optional)

sudo nano /etc/hosts


203.0.113.5 yourdomain.com www.yourdomain.com


7. Test website

https://easy2move.fr


Office 2021 Activation using command

  @echo off title Activate Microsoft Office 2021 (ALL versions) for FREE - office.com&cls&echo =====================================...